Introduction
vb.net project (source code) now available for download - get it on the download pageVersion 2.0.0.4 now available - get it on the download page
PicoMeasure was developed out of a need to make audio* frequency response measurements using my PicoScope.**
*It could be used for any measurement purposes where only two parameters are measured - however it could be adapted to do more measurements.
**I'm aware that the PicoScope has a bode plot option, however I wanted to generate some (hopefully) accurate data for export to another package.
After contacting PicoScope support, I discovered it was possible to get extract the measurement data from the "scope using 'picoscope.com' supplied
with the PicoScope software, using the command: "picoscope.com /a Measurements.CSV?"
I initially tried to script this using DOS and Powershell commands, but that proved to be tedious.
Hence, PicoMeasure was born.
This program is free to use, and I may possibly make the source (vb.net VS 2013) available at some future date.
PicoMeasure will extract preset measurement data from the PicoScope, and output it in comma delimited format.
I developed this solely for the purpose of making audio frequency response measurements, because the 'scope will allow wide bandwidth measurements.
Sample .psdata setup files
Here are two .psdata files that you can load into PicoScope 6, and these will give you the correct settings.
1k oscillator with measurements
spectrum analyzer with measurements (in decibels - so use the Decibel option to capture)
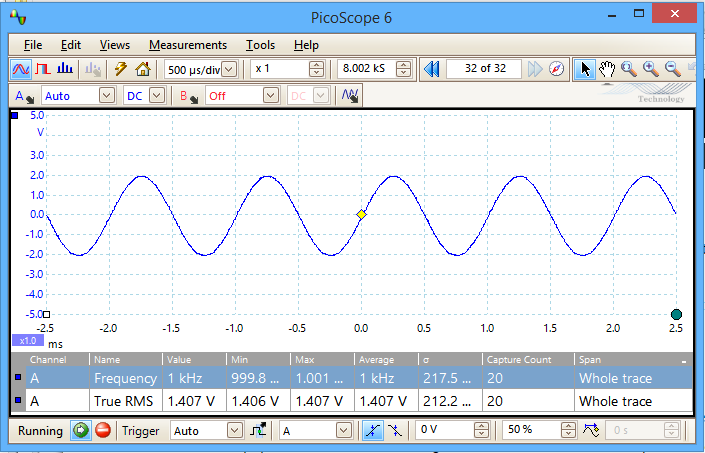
During measurements, my PicoScope is setup like this:
The first time you run the program, you will be prompted to setup the Working and PicoScope folders. How to do this is detailed below.
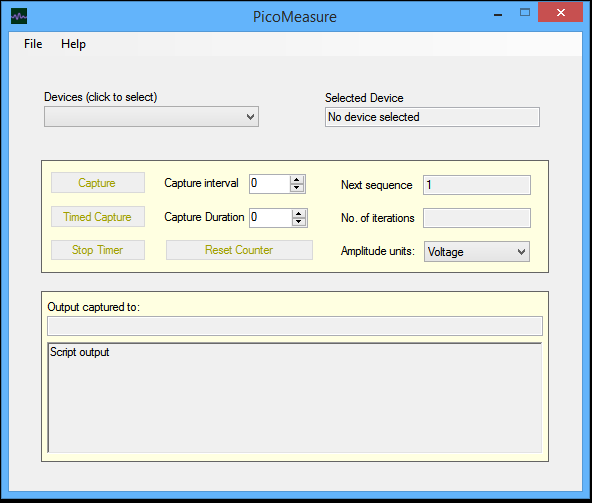
So it is possible to have a 'library' of multiple devices that you can retest at any time.
Firstly, you need to set a working folder. This is where the output files are created.
For example, if you select c:\temp\ the output files will be stored in c:\temp\<devicename.txt>\ where <devicename> is the name you set in the "Add Device" dialog.
You then need to set the PicoScope folder, as this program requires "picoscope.com" which is stored in the PicoScope program folder.
This is usually: "C:\Program Files (x86)\Pico Technology\PicoScope6"
Both the Working folder and the PicoScope folders are set by clicking on the "File" menu in the configuration screen, and browsing to the respective folders, using the menu option.
Once you have set the folders, you then need to add a device (this is the device you want to capture measurements for). You can add as many devices as you want.
Type in the device name, and then click "Add Device" - an initial file will be created in the test output folder assigned above - this will contain a few lines of initial information, commented with the '#' symbol.

If you check the "Delete File" checkbox, the corresponding <device.txt> file will be removed.
Click "Save" to save all settings. (Settings will also be saved if you simply click the red 'X' to close the window) and you will be returned to the main screen.
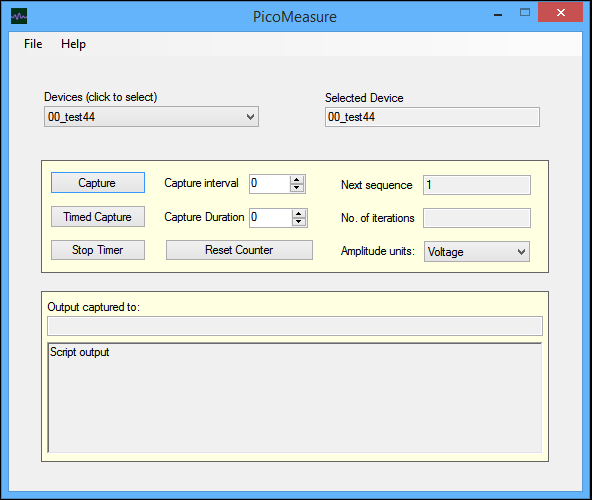
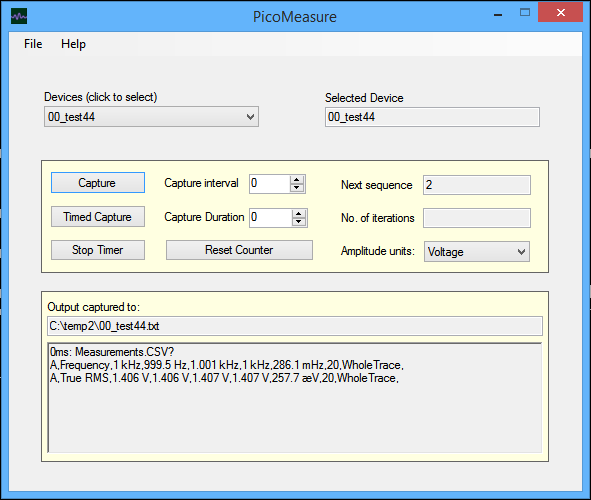
Clicking the "Capture" button will perform a manual "one shot" capture, and will append measurements the device file.
The "Timed Capture" button will take snapshots according to the following settings:
• Capture Interval
• Capture Duration
The capture interval determines how often the data will be captured (minimum one second intervals), and the capture duration determines how long the capture will last for.
The "No. of iterations" box shows which step the program is on.
The "Next Sequence" shows what the next capture number will be.
The "Selected Device" displays which device is selected.
The "Amplitude Units" is set according to the measurement units (dB or Volts) you are capturing.
The "Output captured to:" box shows the destination folder and current filename.
The bottom window shows the output exactly as captured from the "scope, with "0ms: Measurements.CSV?" removed.
Example:
|
A,Frequency,1.005 kHz,1.005 kHz,1.005 kHz,1.005 kHz,185.2 mHz,20,WholeTrace, A,True RMS,1.403 V,1.402 V,1.403 V,1.403 V,245.6 æV,20,WholeTrace, |
This output is then parsed and conversions of mV to volts and kHz to Hz are performed, and the data output to file in comma delimited format.
Once the capture interval and capture duration are set, simply click "Timed Capture" to start automatic capture. This process may be interrupted at any time by clicking the "Stop Timer" button.
The "Reset Counter" button resets the counter to zero, and capture will begin again from zero.
When clicking "Reset Counter" the user is offered the option to retain any existing capture file, or it.
You will normally want to delete it as restarting capture will append to the file, which may not be the desired action.
The "Help" menu takes you a help screen, "About" takes you to the "About" screen.
The program can be closed by clicking the red "x" or from the "File" / "Exit" menu option.
Upon close, all current settings (except the 'Amplitude Units' selection) will be maintained, including window positions.
You also need to have setup measurements within the software, as it is these measurements that are captured by "picoscope.com /a Measurements.CSV?"
(PicoMeasure is simply a "wrapper" for picoscope.com and does not communicate with your PicoScope in any way).
End of document.
Last update: 11th July 2016
Download here.